Memberships
What are TrialBlazers?
TrialsBlazers are cutting-edge research projects and trials sharing the mission of improving the diabetic lives and seeking cures for all types and forms of diabetes:

Each TrialBlazer title within the TrialBlazers directory is a link taking users to additional details on the trial/research being done. If available, users can view the source of the content (A) on a separate page:

If you need additional information or assistance with the site, please use the CONTACT US form.
How do I participate in the Community forums?
Only approved Patrons, DiaGuides, and Executives have privileges to participate within the community forums. All Executives and Premium DiaGuides have rights as moderators and forum builders.
1. To join an open forum, click on the title to access a dialogue box.

2. Once the forum is accessed, the participant will have a choice to create a new topic within the forum or join active conversations within an established topic.

3. Tags are used to further organize the subject matter under discussion.

Inappropriate content will be flagged as SPAM by either the systems NLP or forum moderators. The member in question will be excluded from the community if content is officially deemed inappropriate by the site’s webmasters.
If you need additional information or assistance with the site, please use the CONTACT US form.
How do I add trials to TrialBlazers?
This feature is exclusive to Premium DiaGuide and Executive members only. All trials must be relevant to improving diabetic outcomes and performed only by licensed professionals and institutions.
-
Go to your Content Manager page through the My Account login homepage:

-
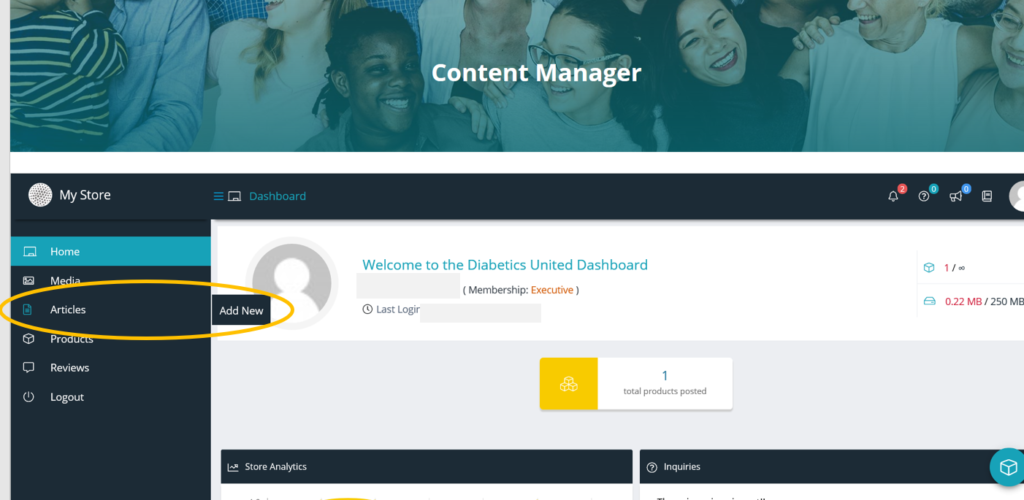
In the Content Manger page, select Articles and Add New from the left of the screen:

-
After selecting Add New, the user will enter the Manage Article page where submitting trial content will occur. Ensure that the TrialBlazers box is checked in Categories for this content to be considered as a trial. Otherwise, the submission will be rejected or will upload as an article or resource. To add a featured photo for the trial, click in mountainscape profile icon designated by gold arrow A. For a short description, which appears to the right of the featured image (example at the end), add content in the text box below titled Short Description. To add an image within the trial descriptions, click the Add Media button indicated by gold arrow B.

-
Further down the Manage Article page, you can add a longer description, which will appear under the trial’s featured image, using the Description text box. Be sure to select the Trial Type, Demographic focus of the trial, Age group(s) of the trial, and what phase the study is in at the time of the submission. To view your content, select the DRAFT button at the bottom of the screen. If you are satisfied, select the SUBMIT FOR REVIEW button. Your submission will be uploaded to the TrialBlazers directory or a rejection notice will be sent to the email associated with the account within 1-2 business days.

-
At the very bottom of the Manage Article page, the option of adding SEO (Search Engine Optimization) and metadata content. If so desired, be sure to use descriptions pertinent to the study in the SEO box and under 160 characters in the metadata text box.

-
EXAMPLE:


How do I edit my DiaGuide profile?
This feature is exclusive to Basic DiaGuide, Premium DiaGuide, and Executive members only. All profiles must be relevant to the diabetic industry. Services offered by licensed/certified professionals only.
-
To edit a DiaGuide profile, go the Content Manager dashboard and select Products on the left column of the screen:

- On the Products page, select the DiaGuide profile needing edits which can be done by clicking either of the three locations flagged by the arrows:

-
On the Manage Product page, ensure make the needed edits (circled), click on PREVIEW (arrow A) to view your change. To save, click the DRAFT (B) button. When satisfied, SUBMIT FOR REVIEW (C):


If you need additional information or assistance with the site, please use the CONTACT US form.
How do I create a DiaGuide Profile?
This feature is exclusive to Basic DiaGuide, Premium DiaGuide, and Executive members only. All profiles must be relevant to the diabetic industry. Services offered must be by licensed/certified professionals only.
-
To begin a DiaGuide profile upload, go the Content Manager dashboard and select Products, New on the left column of the screen:
- On the Products page, select Add New button on the upper right of the page:

- On the Add Product page, ensure Simple Product is selected in the drop box designated by gold arrow A. In the Product Text box (B) type in the full name, followed by any credentials, of the DiaGuide. If an hourly rate is known, input this value in the text box designated by gold arrow C. To upload a profile cover image, click on the image box designated by gold arrow D. Additional images can be added to the profile using the image box and plus symbol (gold arrows E and F). Ensure that the DiaGuide Profile box is checked under categories (arrow G). Based on your focus of Demographics, select what type(s) designated by arrow H. In the Short Description text box (arrow I), input contact details and information for quick viewing. For more details about the DiaGuide services and professional background, use the Description text box:

-
Next, select what Ages (A), Location (B – choose TeleHealth if no office needed), Guide Type (C), length of Experience (D):

-
In addition, but not necessary, continue to Tags (A), Brands (B), Business Names (C), and Catalog Visibility (D). Use keywords for Tags, separated by commas, useful in being found in searches. If you have a Brand and/or established Business, input accordingly. Catalog visibility allows the profile to be hidden, available in searches and/or just visible in the DiaGuide Directory page. Finally, include in detail, Full Name, Credentials, the Organization the DiaGuide represents, business Address, Phone and/or Email:

-
To view your work, click the DRAFT button to preview. Once satisfied, SUBMIT FOR REVIEW. Your submission will be uploaded to the DiaGuide directory or a rejection notice will be sent to the email associated with the account within 1-2 business days. To scroll to the top of the page, use up arrow to the right (A):

-
Once the DiaGuide profile has been submitted for review, the top right of the form will show Pending. Click on the eye logo to preview DRAFT. The profile cannot be edited post-submission without approval. If further edits are needed, make the necessary changes, and resubmit for review:

-
When a profile is approved, it will say so in green on the upper right side of the form. The eye logo will then indicate the number of times the profile has been viewed by users of the site:


If you need additional information or assistance with the site, please use the CONTACT US form.
Why was my membership application, product, trial, article, or resource upload denied?
Diabetics United audits all members, programs, affiliations, products, content promoted on the website to determine diabetic validity throughout the site’s content. Your membership, product, or content upload may have been viewed non-valid for the following reasons:
- Applicant does not align with the mission or vision of the site
- Applicant not valid to serve diabetic community
- Applicant not qualified to meet diabetic needs
- Article is not relevant or inappropriate for the site
- Product upload is not diabetically valid
- Product upload is not safe to promote through open source site
- Profile image inappropriate or not submitted
- Profile(s) content not pertinent to diabetic needs
- Resource is not diabetically valid
- Trial not beneficial to diabetic needs
Or an error in the application process may have occurred. If you continue to receive unforeseen membership denials, use the CONTACT US form and add your reference number within the correspondence to learn more.
How do I upload products to Marketplace?
Only Vendor, DiaGuide Premium, and Executive members can upload products to Marketplace. Once a qualified user’s membership is approved, the user will have access to a content manager account.
1. The content manager link will appear in the left column of links in the ‘My Account’ page after approval:

2. Upon entering the content manager, a Products button will bring the products dashboard visible. The dashboard button at the top of the screen will hide and unhide the selection options titles in the left window.

3. At the top of the content manager window, the number of items allowed and remaining in the membership to upload is listed in red. To enter the product upload dashboard, click the ‘Add New’ button in the right-hand corner of the content manager dashboard.

4. In the product upload dashboard represented below, arrow “A” represents a drop-down menu to designate if the item is a product purchased directly through the Diabetics United site or if the product is to be purchased offsite. Arrow “B” represents the short description section. These details will appear to the right of the product’s profile image once the upload is complete. Arrow “C” represents the full description section. These details will appear beneath the product’s image once the upload is complete. Arrow “D” represents product profile image upload option. Arrow “E” represents image gallery upload option. The plus symbol will add additional image upload options represented by arrow “F.” Arrow “G” represents product category options. Choose “+Add new category” represented by arrow “H” to gain options on what category your product should be found within.

5. After clicking the “+Add new category” link, a selection window will popup providing categories to choose from for your product. Ensure the “Marketplace” is chosen as the parent category. If your category is not shown, type in a desired category of your product and click the “Add” below.

6. After your products category has been determined and selected, move down through the page and designate demographic(s), Age(s), and Location the product is coming from or where delivery is available. No need to designate guide type or experience when uploading products.

7. At the bottom of the products uploading form, the options for Tags, Brands, Business Names, and Catalog visibility. For Tags choose keywords describing your product which users can use to find your product. Be sure to separate these individual tags by commas to distinguish the terms. For Brands, choose the brand name and/or brands similar to your product for those searching specifically searching by brand type. For Business Names, choose your business and any other business your product may be affiliated with in a search. For Catalog visibility, set this function to how you want your product to be found or not found. OPTIONAL – In the SEO text boxes, choose keywords which will optimize the search of your product within external search engines. Also, choose up to 155 characters of HTML or snippets of phrases which will help shoppers find your products using GOOGLE, BING, TWITTER, etc.

8. If your product or business has any specific policies for shoppers to be made aware of, be sure to include within the text boxes below the SEO options.

9. FINAL STEPS – Once you are satisfied with the content you have associated with the product(s), be sure to view a DRAFT of your work. After reviewing, select SUBMIT FOR REVIEW. You will then receive an auto-mated confirmation email that your product upload has been submitted for review. If approved, your product will be displayed within the Diabetics United Marketplace. Typical review turnaround time is 1-to-2 business days. An email from admin@diabeticsunited.com will sent notifying once approval or denial of the upload has been finalized.

10. A video of the product upload process can be viewed HERE
If you need additional information or assistance with the site, please use the CONTACT US form.
How do I access my account details?
Users of the site must become members to have access to My Account details.
-
On the Home page, click on the My Account link located on the top ribbon of the page:

-
Input your account login information:

-
After logging in, users will be greeted by the My Account page. This page gives members access to editing profile details, uploading content, reviewing profile statistics, etc. Quick links to specific features are flagged by arrow A and additional pages pertaining to user accounted designated by gold bracket:

If you need additional information or assistance with the site, please use the CONTACT US form.


Can’t find your answer?
For further details, please contact us.